This guide was originally written by people in the SRR Wikispaces before the whole wiki was shut down.
Setting Up a Prop[ | ]
Make an image with this exact format[ | ]
<tileset>_<group>_<name>_<orientation>.png
group is wall, floor, walldecor etc
orientation is n, s, e, w
The full name must not contain 'meta' - no 'metal', no 'metahuman' etc
The image has to be at least 40x40 pixels in size.

To create a new prop, select “New Prop” from the gear icon pulldown on the right of the Asset Library pane. The Prop Editor will appear. Below is an overview of the different functions of the Prop Editor. (Step-by-step instructions follow below.)

If the editor generated extra prop views you don’t need, you can click the eraser button beneath the window with the direction you want to erase.
As a general rule, most props have only one painted rotation, so in the prop editor they should have a south and east facing defined, but not a north or south. Props where a 2nd rotation was painted should have all 4 facings defined.
Exceptions:
- Walls, floors and buildings will often work differently, look at examples of existing props of these types to see how they are set up.
- Props with significant readable text on them should not be flipped horizontally. In these cases, a separate East facing of the prop should be saved, where the prop art is flipped but the text decal is not.
Setup the Render Box[ | ]
The wireframe box that appears around the prop is the Render Box for that prop - this represents the 3D geometry onto which this prop will be projected. It’s important to make sure that the Render box accurately fits the prop art, otherwise our lighting system will not interact properly with our 2D props.
If a prop doesn’t fit well when imported, you should attempt to fix this by editing the dimension of the Render Box. If you get the box to fit well, transfer those values to the other views, but remember, the width and depth is inverse from south to east and north to west, like so:

If it still doesn’t fit right, it’s usually because of stray transparent pixels on the .png, or because the png size isn’t a multiple of 160 pixels- the editor likes them better when they’re cropped to those multiples. You can check for and fix these problems in Photoshop.
Setup the Grid Footprint[ | ]
The grid footprint of a prop is auto-generated, but if it’s too big or small you will need to manually set the grid size. You can do this by editing the Grid Tiles Width and Grid Tiles Depth for each rotation of a prop. The grid footprint should always be consistent between the different facings of a prop - if the south facing is 3x2, then the east facing should be 2x3.
In some cases you will need to use the “Render Offset” values to adjust how a prop fits onto the grid. You should make the prop line up with the grid the same as it did in the art template file.
Please see the existing examples of walls, floors, buildings, tables and other types of props to see how a given prop should be aligned to the grid. Most of all, it should simply make sense and be easy to use in a map.
Setup the Grid Properties[ | ]
Each grid square appears either red or grey, and has two icons inside.
- Grey means characters can MOVE through this square. Red means they can’t.
- The eye means characters can SEE through this square, I.E. it is see through or below average eye height. The eye with a slash means they can’t.
- The bullet means characters can SHOOT through this square. A bullet with a slash means they can’t.
Before editing these settings, click the art visibility toggle (the button-shaped icon on the left of the visibility toggles) to make the art semi-transparent so you can see the grid better.
To set each of these settings, first select the icon for which setting you are applying. Then click on each square you want to apply it to. The SEE-through and SHOOT-through setting for a prop should always be equivalent. EXCEPT for windows. In other words... if you can see through a prop, you can also shoot through it, unless it’s a window. Windows can be seen through but not shot through.
Prop Naming & Definitions[ | ]
Next, you’ll need to give the prop a “pretty” name and set a couple variables for it.

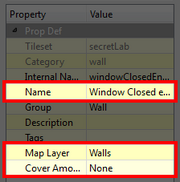
Name - The Name field is basically for a more recognisable name than edge01 or modernFramedPainting04, what we’ve been calling the Pretty Names. Pretty name conventions are:
- Main object name(s) first and upper case, usually straight from filename nouns, but extrapolate if you think another word or phrase might be more searchable or readable (I.E. Pile of Skulls instead of Skullpile).
- If there are multiple (or may yet be multiple) versions of the same type of object, add a double-digit number at the end. Examples include “Stall large orange 01”, “Billboard Holy Smokes”, “Building 1 Roof corner butt”, “Stall electronics 03”.
- When in doubt, see how other props have been named.
- Banned Names: anything with the word *meta* in it - “metal”, “metahuman”, etc. This causes a bug in Unity, which uses “.meta” files.
Map Layer - this setting tells the game how to layer props on top of each other. Select the appropriate layer for your prop:
- Ground: all tiling interior and exterior floor & ground tiles.
- Ground Decorations: things that go on top of the ground but do not have gameplay-affecting height on them - for example, a manhole cover, a floor vent, or a floor decal.
- Walls: all wall and building parts.
- Wall Decorations: things that are meant to be attached directly to the side of walls/buildings - for example, some signs, posters, graffiti, whiteboards, wall-mounted monitors.
- Props: All other props which don’t fall in the above categories.
Cover Amount - This determines how much cover the prop provides in the game. The general rule is that you want to think about it in a way that you might think about hiding behind an object in a real life gunfight.
- Really thick, big, and heavy objects, like refrigerators or generators, will suffice for heavy cover.
- Medium cover is for objects that would block most shots but may still let some over or through them.
- Light cover is for objects you can hide behind but are even more likely to let shots through - say, a pile of wooden pallets, or a small tree.
- None is for objects that shouldn’t give you any cover, like a stool, lamp, or a painting. Almost all ground, floor, wall, building, ground decoration and wall decoration props should have the “none” cover setting. Things that are too big to be seen through or shot through should also have this setting.
Normals[ | ]
Normal settings tell the game how to light stuff. For more on lighting, check out Lighting and Normals.
- Box / Sphere settings give a gradient shading to props, and are used for the majority of standalone props that aren’t designed to tile with other props.
- Wall S - for all wall and building tiles that face south.
- Wall E - used for cleaning up Earth’s leftover garbage.... get it.... same as above, for E.
- Wall N & W - shouldn’t be used! from a lighting standpoint, all walls are facing S or E.
- Box Hard - used for wall corners and pillars. Also for specific, hard-edged props which conform very correctly to their render cube.
- Floor - for floor tiles and floor decorations. Also - for anything which you just want to receive “flat” light instead of “3D” light. As an example, the secretLab table set doesn’t tile well when it’s set to “Box”. Setting it to floor instead means it will still take light, but just take it evenly across the whole prop. Very useful if you can’t get things looking correct with Box.
- None - nothing should be set to “none”, if you see this, set the prop to one of the above settings as appropriate.
Lit vs. Unlit Props[ | ]
By default, all props should be “lit”. For some things you may want a separate glow prop for an existing prop with the suffix "_lights" (such as awesomeSet_signs_derpTownSign_s_lights.png) and assign this the “unlit” property; there are some examples of this in the secretLab set.
In some cases it may also be appropriate to mark a non-glow layer prop as “unlit”; the Pike Place market sign for example, or other neon signs. You would do this for a fairly unique prop that has lighting painted into it, and that you don’t want affected by light in the scene (probably because it looks funny in the game otherwise.) This will apply to all uses of the prop in your UGC, so please consider that before you apply those changes.